Showing posts with label Recipes. Show all posts

Friday, October 24, 2014

Busy Week Life Saver :: Overnight Oats

Hello everyone!

wow, this week has been..  really crazy.
Don't get me wrong, I am loving every moment of it, and I feel so blessed to be able to play with the Boston Phil, but adding their rehearsals and concerts to my schedule has completely... swamped my schedule.  

I will have to do another post later when I have more time about what I've been doing exactly during the absence from the blog, but today, I just wanted to stop by and let you guys know about something that has been really saving my life during this week.  It has single handedy prevented sooo many fast food runs when I haven't had time to go home to make lunch or dinner.

So the star of the post?  
the Overnight Oats!!

There are many different kinds and variations of overnight oats, but Shawn, my roommate, introduced this particular way of making them to me, and I am forever grateful.


All you need to make this filling and super quick meal-to-go is!!
-a mason jar
-1/2 cup oats
-1 cup almond milk (or any other milk)
-and toppings!
This time, I chose 1 tsp cinnamon, 1 Tbsp peanut butter, and some fresh dates.


You can make this meal in literally 1 minute.
I'm not kidding.
all you do is, dump in your oats (1/2 cup if you are hungry, 1/3 if you aren't), pour in your milk of choice (double however much you put in for oats), and add your choice of toppings!


and shake it off, shake it off~ shake, shake~


couldn't be easier right?  
I know it doesn't look all that appealing, but I promise it's delicious.
You just have to let it sit for a couple of hours and it will be ready to go!
Pack your cute little mason jar and a spoon, and you will be saved from running to the fast food restaurant for every meal during your hell week!

Have a wonderful weekend, and I will talk to you all soon if I survive this weekend (actually, add monday and tuesday to that...)
thanks for stopping by!
--Janny

Thursday, May 15, 2014

4 Ingredient Chocolate Chip Cookie

Hello everyone!

The thing about moving out is that it takes more than 1 day to pack everything you own and move out of your house. But while you are packing stuff away, you still have to live...  so it's the art of balancing what needs to be packed away first, and what needs to be packed away last, and etc.  However, there comes a point where the interests clash, like yesterday when I wanted to bake cookies.

I don't have butter, I don't have eggs, I don't have flour (they've all been given away last week because I didn't think I would need them anymore.. I should have known better!), but I still wanted cookies.  I suppose I could have just gone to the store to buy those ingredients, but it seemed wasteful to me to go and get new boxes of all of the ingredients when I knew I would only have time to make 1 batch of cookies!  So I just had to make do with what I had (plus a new bag of chocolate chip cookies, but I know I'll go through that before I leave.  I mean, it's chocolate.  haha)

And thus, this 4 ingredient chocolate chip cookie was born.
I really wasn't sure how it would turn out, but I'm happy to say that it's actually surprisingly good! and the best part?  it's pretty darn healthy!  =)

So this is what you are going to need.
  • 3 ripe bananas
  • 2 cups of oats, blended in the food processor
  • 1/2 cup of almond butter (could also use peanut butter)
  • 1 cup of chocolate chips!

yup, that's it.  could not be simpler, right?


so let's begin by preheating the oven to 350.
then, pulse those 2 cups of oats in your food processor.  You don't have to do this step if you don't want to, but this kind of makes a substitute 'flour'.


Mash the 3 bananas with 1/2 cup nut butter of your choice, then mix in the oats.


Lastly, stir in the chocolate chips!

I must say, it looks pretty legit, doesn't it?
After that, all you have to do is shape the dough into a cookie shape.  Remember, the dough isn't going to expand or flatten out, so really make it into the final shape you want

Pop it in the oven for 12-14 minutes, and voila!

I've tried my hand at 'healthy' cookies before, but this is the best one so far!  AND I got my cookie fix without having to go buy a whole lot of ingredients before I left town  ;)


I hope you enjoy the recipe as much as we did!


Thanks for stopping by!
--Janny

Wednesday, April 30, 2014

Easy Peasy Spinach Artichoke Dip!

Hello everyone!

Here is the promised Spinach Artichoke Dip that we whipped up for our Easter potluck!
It turned out so well--perfectly browned on the outside, but so creamy and gooey in the middle. Everyone loved it at the party, and we can't wait to make it again soon!


To make this easy dip, you're going to need:
1 cup chopped spinach (frozen, no need to thaw)
3/4 cup chopped artichoke hearts
1/2 cup mayo
1 cup cheese (Monterey Jack, Pepper Jack, etc)
1/4 cup mozzarella cheese
3 cloves of chopped garlic
1/2 tsp red pepper flakes

Before you begin, preheat your oven to 350 degrees, and butter up a small loaf pan.
Then, chop everything that needs to be chopped, and then start throwing everything into a mixing bowl, like this!


and then, all you have to do is,,,, MIX!


And then, and transfer over your concoction into the loaf pan, sprinkle some more cheese on top if you want, and then pop it into the oven for 25-30 min! 
 It may take longer depending on your oven, but keep an eye on it to see when the cheese on top gets golden brown!


It was such an easy thing to make for the party, and was such a hit!  I hope you enjoy the dip as much as we did, and thanks for stopping by!

--Janny

Sunday, November 3, 2013

RECITAL IS FINISHED!!!

Hello everyone!
I hope you all had a wonderful weekend!

My recital is finished!!!!!!!!!!!!
I can't even put into words how relieved I am to be able to say that because I injured my left wrist a week before the recital, and the whole week we weren't sure if I could play the recital at all.  If we had to move the recital, that would have been an awful nightmare because everything gets booked up here at Shepherd School of Music like a whole year in advance, not to mention juggling 10 different people's schedules who were involved...

but yes, I am glad it is over, and now I can get back to doing other things.  like living.  and blogging.  and practicing other repertoire...  haha

Anyway, here are some photos from the recital!
I forgot to take pictures of the reception table, but there were many different kinds of cookies, cream puffs (which we're going to do a recipe here soon), and the Trader Joe's Spinach Kale Dip.


The recital itself was an interesting venture with a coughing fit from the performer in the middle of a piece, as well as a wardrobe malfunction--if you wear an infinity dress, make sure you tie and knot the ribbons...  I just tucked the ends in, and... let's just say that is not a good idea if you're going to be on stage and you're going to be using your hands to do something else.  No worries, I caught it in time and there was no Janet Jackson episode, but man...  the most interesting recital experience ever.

Anyway I can't thank Mr. Lin enough for teaching me for the past year and a half, and always pushing me to my maximum.  I really feel like I'm going to look back on my graduate years as the years where I practiced like a crazy woman  haha  =)  but he is such an inspiration, and I couldn't have asked for a better teacher for where I am as a violinist!


and of course Neal, our studio pianist  =)  I don't know how he learns and plays so many different pieces that we play!  It's been so wonderful getting to work with him these past year and a half!

Oh!  and funny story: Betsy and I met when we were like...11?  we were in Tri-City Junior Youth Orchestra together, and we lost contact for like 8 years or something and then we realized we both were in Houston!!  Thank you Facebook.  So she came to my recital and it was SO much fun getting to catch up  =D


And of course, some ballrooming love  =)  we met through ballroom last year, and it's been so awesome to get to know and hang out with this girl  ;)  


and of course, the three people the recital could not have happened without these three people in my life!
my roomy for being so accommodating during my freak out week leading up to the recital where I was incredibly messy around the house because I guess my level of stress directly correlates to my messiness... she also baked cookies and got me flowers!  best roomy  =)
and my boy, of course, for dealing with the grumpy Janny during my injury episode, because when I can't play the violin and I want to practice, (because let's just admit it, sometimes we just don't feel like practicing!) I am rather grumpy.  Oh, and just being so supportive and helping me bake  =)
and Satoko!  We played Strauss together for the recital, and she has been such a trooper learning that sonata because man, that piano part is like a piano concerto!  and just being overall so accommodating throughout the whole process  =)


Thank you everyone for coming, and I am so thankful for everything and everyone in my life.  Feeling just so incredibly blessed  =)
I hope you all had a wonderful weekend, and thanks for stopping by!
--Janny

Friday, September 13, 2013

파전:: Korean Seafood Pancake!! 3 ingredients(+water) version.

Hello everyone!

Happy Friday!!!!  I am oh SO glad the weekend is here!!  Yesterday I had a marathon of coachings and lessons, so this was very much needed.  This 'break' is going to be a pretty short lived one though because I have another lesson on Monday *whimper whimper* but I'm just not going to think about that right now  haha

Anyway, today I thought I would bring you a very much so requested recipe!
We don't go out to eat very much, but one of our favorite places to go in Houston for Korean food is Tofu Village!  We've gone there for our triple date, to celebrate the completion of my recital, etc etc.  It's actually also the first place David and I went out to eat together!  haha

Anyway, they have this dish there called 'Korean Seafood Pancake' and we just cannot get enough of it.  It is just so good!!  I think every person (including non-Asian picky eaters like Amulet  =p) who has tried it as loved it.  
So when I was home this summer I asked Mom to teach me, and much to my delight, it was incredibly easy to make!!!  Of course you can get really fancy with it, and my friend Miran has recently informed me that it's really good with zucchini in it too!  I have never tried that before, but you know it's going to happen soon  haha.  So there can be a lot of variations, and I suppose if you were really starting from scratch (rice flour and all that jazz) it would be a bit more difficult, but I'm here to share with you the BASIC, college-student-friendly recipe that anyone can make!

So, here is the 3 ingredients + water version of 파전!


Ingredients  (makes 2-3 big pancakes)
1 cup Korean pancake mix
1.5 cup chopped squid (if you get the already chopped and frozen kind, it's really easy)
1.5 bunches of green onions
a little less than 1 cup water
1 jalapeno pepper optional


Korean pancake mix looks something like this, and you can find it at your local Asian store like H Mart.

The squid can either be in its full form, in which case you have to cut it up into little rings and bite sized bits, or you can just buy the frozen kind that's already prepared for you, like this one below!


Now let's get to cooking!!
First cut up your green onions and squid rings into 2 inch long sections.  We just cut the squid rings in half and called it good.


Now, if you have a little jalapeno or chili pepper growing in your garden, then feel free to cut that up and add that as well for a little 'zing' if you'd like   ;)


Now, measure out a cup of the mix and mix it well with a little less than a cup of water.  You can definitely just do this by hand,,, I just got lazy and brought out the electric mixer  haha
Once your mixture is lump free, dump your prepared green onions, squid, and peppers (optional) and mix until the fresh ingredients are well coated.


Now, oil your frying pan, set the fire on low, and start cooking your pancakes!

you don't want the pancake to be too thick, so make sure you spread out the mixture well in the pan.  Once they start cooking, 

now. patience, grasshopper.  the pancakes should take about 5-6 minutes to cook on each side, and don't jump the gun!  otherwise you may have a pancake that's falling apart, or even worse, not crispy!   I absolutely love it when these are crispy on the outside  ;)   You should be able to tell when to flip because the top sections should start to look like they are becoming cooked as well. 


 They should be wonderfully golden when they are ready on the side, kind of like this


and once you've got them to be like that, pat them down with your spatula so the that the pancake gets thinner, and the inside portions also get cooked along with the other side!


and that's it!!


try putting the root parts of your green onions in a jar of water, or plant them in soil so that you can make the pancakes again from your own 'garden'  ;)


 Happy cooking, and thanks for stopping by!!!
--Janny


Saturday, July 13, 2013

Meadowlarks Iron Skillet Dessert Pizza!

Hello everyone,

Whenever The Meadowlarks are together, we always like to make homemade pizza together.  It's a tradition that goes waaaay back to the beginning of our friendship, and we have never, EVER, failed a pizza.  haha We always try interesting combination of toppings and sauces, so we thought we would try a fruity pizza this time around since we had lots of fresh fruits on hand, and we had never tried to make a dessert pizza before! and here is our finished product!!

Not bad for the first time, eh?  and oh my gosh, it was SOOO good!!


and because we loved it so much, I wanted to share this recipe with you so that you can also try this amazingness that is the Meadowlarks Iron Skillet Dessert Pizza!

Ingredients
Pizza dough of your choice
Iron Skillet
1 peach
1 banana
2 handfuls of strawberries
1/4 cup sugar 
1 tsp cinnamon
1 tsp ginger
1/2 tsp nutmeg
2 tsp vanilla
1 swig(?) of bourbon


Let's get cooking!

1.  first, preheat your oven to 400, and cut up all of your fruits into bite sized pieces.  You know by now how much I love things bite sized haha

2.  Put your fruits in a pan with the sugar, spices, and vanilla and cook on low heat until they resemble pie filling.  Before you throw everything in, check to see if all of your fruits are about the same 'squishness'.  In our case, our peaches were firmer than the others so that's why I put them in first.  You can do the same to prevent the softer fruits from becoming complete mush. 


3.  Make sure the heat is on low.  Yes, it may take awhile, like 15-20 minutes, but patience, young grasshopper.  I promise the end result will be well worth your time!


4.  Once your fruit concoction looks like the above picture, get your inner fancy chef to work on flambeau-ing your fruit concoction.  In our case, Timmay was more than happy to oblige.  To do so, you just need to pour a little bit of bourbon, and light it on fire!  This step--lighting it on fire--,however, is completely unnecessary, and you can just let the alcohol evaporate on its own if you don't have a chef-friend on hand  =) 


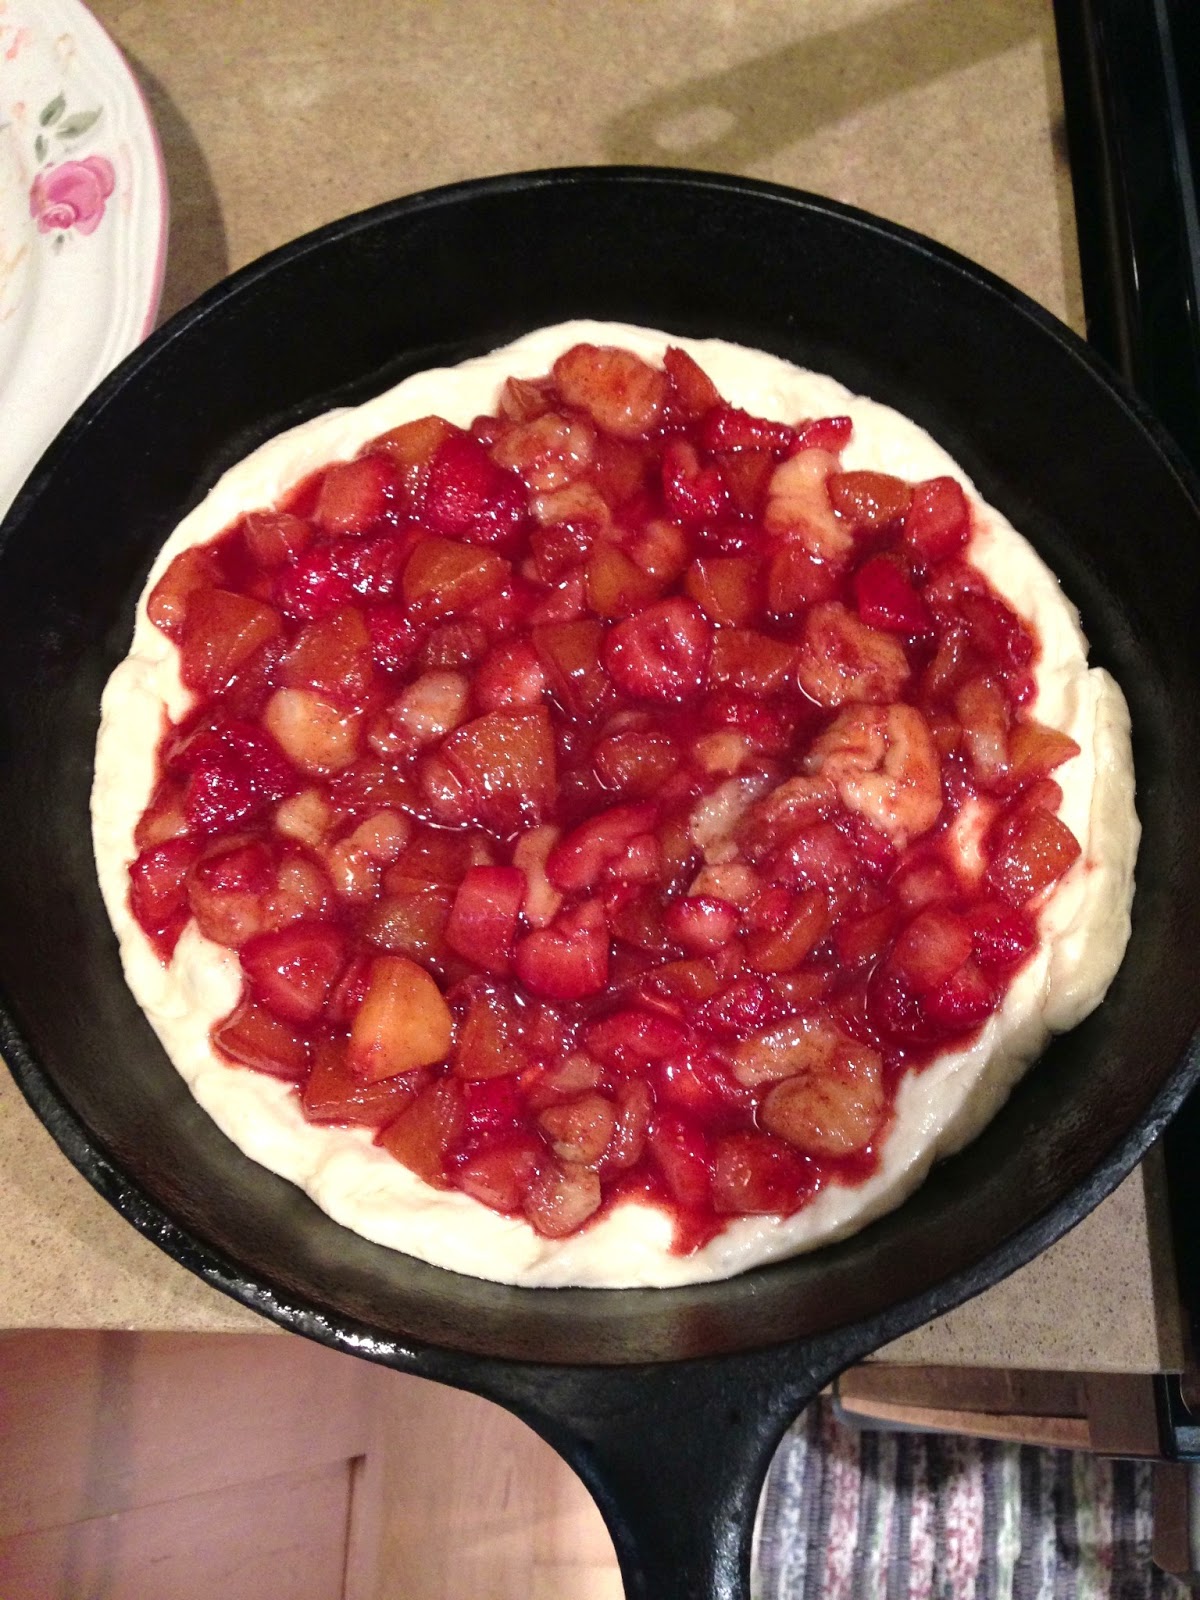
5.  Then, spread out your pizza dough in your skillet and put the fruit topping on!


6.  Bake in the oven for 20 minutes, and tada!!  Look at this beauty!!


7.  Wait for a couple of minutes for the pizza to cool a little before digging in!

yuuuummmmm!!!!!  this was so good.  SOO good!  we can't even tell you how delicious this dessert pizza was!  so go ahead and get your baking on, you won't be disappointed  ;)

I hope you are all having a wonderful weekend, and thanks for stopping by!
--Janny